Monday, April 9, 2012

Ghiradelli Chocolate Treat holder revisited

Okay, so this month at club Toni wants to make these cute little Ghiradelli chocolate treat holders.
You can see the original post, and the tutorial on how to make them here
I just love the new Summer Smooches stuff that we can order in the month of April, so I decided to use those for our treats this month.
This is a side view.  I used some retired gold cord to tie it together.  You could easily use some of the 1/8" taffeta ribbon instead.
Here is a sneaky peeky into the middle. 
These really are a fun way to give a little treat to someone.
Of course, just handing me chocolate makes me happy whether it's in a cute pacakage or not.....{{big cheesy grin}}}

This is a blurry picture of my 7 grandchildren that we tried to get after the Easter Egg hunt on Sunday.  It's getting harder to capture them all together at once now that there are more of them, and so young.  So, I'll take blurry over nothing at all.

Thanks for peeking in today.

Saturday, April 7, 2012

Hear comes Peter Cottontail....

If anyone has been following my blog long enough, you might recognize these cute little bunny bums from last year. 
I just think this is such a cute card that I had to make one for my club girls.
 Unfortunately, it uses the retired small oval punch for the bottom of his feet.  I guess if you didn't have that punch you could wing it somehow.  Sidenote: one of my club girls was telling me that she has been looking for that small oval punch on ebay.  She found one that went for $75.00!!!  Wow!!!  That's just crazy to me.....she did find one for much cheaper than that, but my mind still spins that someone would spend that much for a punch.  But, I wouldn't sell my punch....not even for $75.00, so I guess that says how much I value mine huh????
 I used the Trendy Trees stamp set for the carrots in Pumpkin Pie and Lucky Limeade, and Teeny Tiny Wishes for the Happy Easter.  For the body I used the 1 3/4" circle punch, for the head I used the 1 1/4" circle punch, the tail uses the 1/2" circle punch and then the oval punches for the ears and feet.  I used the 1/8" punch for the little toes on his feet.
Then, I had to let my girls know how much I LOVE being their Stampin Up demonstrator, so I stamped it in the middle, added a few carrots and off in the mail they went.
If anyone really knows me, they know it was "shocking" that I made the cards and got them in the mail on the same day.  I just don't do the post office really well.  I'm really good at making cards, but HORRIBLE at sending them.  So, I was a little proud of myself that I was able to get those in the mail.  So silly I know.

If you are one of my club girls, and you haven't gotten your card in the mail yet, well now you know to be looking for it.  {{{big cheesy girn}}}

Thanks for peeking in today.
I need to go clean my house.....yuck!!!  Where's that darn fairy godmother when you need her?????

See ya.

Thursday, April 5, 2012

A Pinwheel baby shower

Last weekend I threw a baby shower for a friend who is having a little boy here soon.  I didn't want to do the typical little boy colors and theme.  I thought pinwheels would make a cute little boy shower, and I think they did.  I used the DSP Big Top Birthday and the stamp set Sweets for the sweet for the cupcake toppers.
I made 30 #2 boxes and wrapped some DSP around them and added a pinwheel on top for the party favors and filled them with chocolate of course....
Then I made a really cute banner that hung in the living room as you walked in.  The bottom picture is just one of the pinwheels, but I had enough made to spell out "Welcome Baby Nicholas"  They were really cute and she took them home after the shower to hang in the nursery. 
I didn't get a good picture of the banner because I didn't think about taking pictures until people were already here.
So, I've been a busy girl and it has been so much fun making everything.
Thanks for peeking in today.

Have a great day.  

Tuesday, April 3, 2012

Embossed tulips with a twist tutorial

I have had a few requests for the directions on how I made a card similar to this one.  I have had trouble with uploading these pictures and so they are somewhat out of order.....just ignore that {{big grin}}
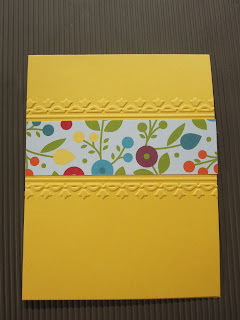
So, this is what the card looks like after it's been run through the Big Shot and before I added the punched flower.  Below I show you the details of how it was done.
 Here is the card with the Blossom punch added.  I left a sentiment off so I can add it when needed.  I just love this new Summer Smooches DSP.  It really is a happy pack of paper!!!!  I also used one of the fabric brads for the middle of the flower.  I love those too.
 Now, onto the details. 
You cut your paper 11"x4 1/4" and then score it in the middle at 5 1/2".
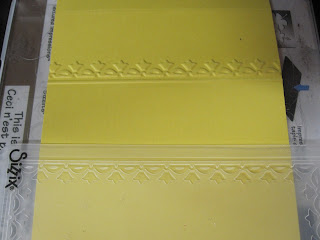
 Hopefully these pictures will explain things better.  I'm not a tutorial queen by any means, so bear with me here.  You'll notice I have the framed tulips folder so only two sides are actually on the paper.  I don't think you can see it very well from the picture, but the score line is hidden in the embossing folder.  I wanted the tulips to be standing up on the top part of the embossing, so I made sure that the tulips were "UP".  It woud be the bottom part of the embossing folder from the picture below.
 Hopefully this close up helps you see it a little bit better.  You can actually see the score line in this picture, so you get an idea of where the paper is in the embossing folder.
 Then, run it through the Big Shot, BUT....make sure that the top part of your card is what is going through the Big Shot first.  Otherwise, you will emboss the tulips that are along the back side of the card, and you don't want to do that.  After I run the embossing folder where the tulips are on the front of the card.....then I BACK IT OUT.  Don't run the whole embossing folder through the Big Shot.  Only the front half of the card.
 Hopefully this picture helps . 
 After running it through and then backing it out, this is what the front of your card looks like now.
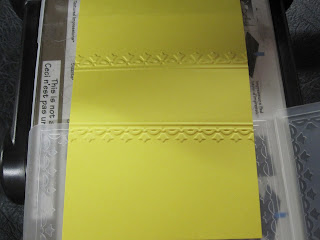
 Now, flip the embossing folder around.  This way the tulips will be facing down.  It just gives your little area a nice frame.  Then, you will run it though the Big Shot the same way as above.  You run it through and then back it out.  Don't go all the way through the Big Shot with your embossing folder.
 When you are finished, this is what it should look like. 
I made a few mistakes the first few times I did this trying to figure it out, so don't be discouraged if you have to try a few times to get it right. 
When you are done, you just decorate your front however suits your fancy. 
You can make your empty space as far apart as you want for whatever you choose to do to the front of your card.

I sure do hope this wasn't too confusing and helped explain a few things. 
Once you get the hang of it, it whips together really quickly.

Now go try it yourself and see how you do.

Thanks for peeking in and have a wonderful day.