Friday, November 18, 2011

Thursdays club projects and a baby picture


How cute is this little gingerbread house?
We learned how to make a house similar to this one at Convention and I've been waiting to share it with my club girls, and finally got the chance. I wanted mine to be more of a gingerbread house than the one we saw at Convention, so I changed a few things.
And you just lift up the lid and you can put all kinds of yummy treats in there for gifts for neighbors, coworkers, friends, whomever you see fit. It was really easy to make too. I have next week off from work for Thanksgiving, so I will put together a tutorial for this and post it here soon.
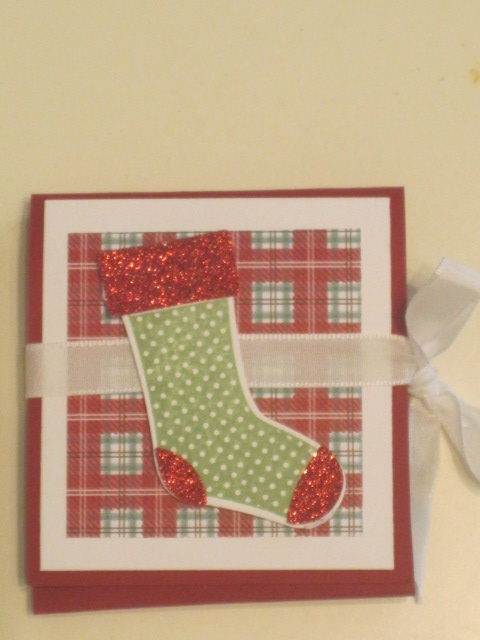
Then we also made these cute little stocking holders. We also learned this cute little box idea at convention. This Noel one isn't the one we made on Thursday. I just wanted to show the girls that you could bling it up a little and how cute it would be.
This is the one we actually made. I loved it and so did the girls. We ran the real red cardstock through the snowburst embossing folder before putting it together, and it gives it such a fun texture and look.
This is a view from the top, so you can see that we used the box #2 die for the middle to hold little treats. You just flip the box on it's side, and cut off what becomes the top of the box.
Here is a side view. If you look really close at the stockings themselves, you will see that we sandwiched two pieces of real read cardstock in between the white piece of cardstock that comes in the DSP package. It helps to give it some stability.
And then here's a close up of the box and decorations that we added to it.
What a fun little box this was to make too.We also made a cute little Santa topper for the new 1" x 8" cello bags filled with M&M's. I will have to post that another time with the tutorial, because it was just adorable.
Speaking of adorable, I just had to share an updated picture of my newest grandson.
Check out those cheeks!!! Those cheeks are for kissing!!!!
He's getting so big so fast. I can't believe that he is already 7 weeks old.
Thanks for peeking in today.
Have a wonderful day today.
I took the day off work to go see the new Breaking Dawn movie.
I had a friend go last night and she said it is the best one yet, so I'm excited.
TTFN

Saturday, November 12, 2011

Yep, more Christmas cards

I decided that today's post I would just add the remaining three Christmas cards I have already made  for my upcoming card buffet. 
As you can see I kept them simple.  I have a good friend who is Jewish, so I knew I needed to add a card to my card buffet that could cover my sweet Jewish friend as well.  So, this is the card I came up with.  The snowflakes are embossed with silver embossing powder and then I ran it through the polka dots embossing folder.  I added a few rhinestones and was done.
 For this card, I cased it.  I just punched the snowflake from the white cardstock and then stamped the sentiment.  Then I ran it through the polka dots embossing folder.  I added a pop of real red cardstock underneath the white and layered it on some Pear Pizzaz and Marina Mist.  I added the button with some bakers twine.
 This was also a case from Stampin Connection but I can't remember who it was that I cased.  I think this card is very pretty and elegant and also very easy.
Tomorrow I will show you the cute projects we made at club last Thursday.  I have been waiting to make these projects since I saw them at Convention in July.

Thanks for peeking in.
Have a wonderful day.

Friday, November 11, 2011

Pack of tags for thank you's

I absolutely love my club girls and appreciate their business and friendship  So, I wanted to give them a little thank you.  Thursday was our last club meeting for this round, and I knew some of the girls weren't going to be able to rejoin for various reasons.  I wanted them to know how much I appreciate them, so I made them some tags and packaged them up.

I have some other fun little gifts for them that I'll show you later.

Thanks for peeking in today.
Have a wonderful day.

Thursday, November 10, 2011

Shaker Frame card

As soon as I saw the Shaker frames in the new Holiday Mini catalog....I knew I had to have them. When I saw this cute card on Stampin Connnection, I knew that was the card we would be making as one of the cards at my Christmas card buffet. I actually made one before this without the red cardstock. What a difference that little pop of red made. I like this one soooooo much better.
I also love that wonderful new embossing folder. It is one of my favorites of all time.....well, until the next one comes out....hahahahaha
Thanks for peeking in.
I hope your not getting sick of Christmas cards yet because I still have lots left.
Have a great day.

Wednesday, November 9, 2011

Merry, merry

Here is yet another one of the cards I have for my Chrismtas card buffet. I'm trying to make them cute, but simple. I think this fits the bill for both. It's funny how little details can add so much to a card. Adding the cute little safety pin and the merry tiny tags really made a huge difference. Then when I added the snowflake and rhinestone brad, it made it even better.
So, I went one step further and added some dazzling diamonds to the base of the Christmas trees for the snow. Again, it really made a cute little difference.
Thanks for peeking in again today.
Have a wonderful day.

Tuesday, November 8, 2011

Snow much fun

Playing with paper can be "snow much fun". I have been working on my Christmas card buffet coming up pretty soon. This is the card I made last night. It was a case from Lisa Young. I thought it was so darned cute with the Distressed Dots stamp all embossed with white embossing powder for the snow. So clever.
I have more cards to share. I have been having problems with blogger, so hopefully it doesn't take me forever to post again.
Thanks for peeking in.
Have a wonderful day.

Monday, November 7, 2011

Gingerbread and sugared things

Can I just say that this is such a fun sketch to play with? 
I knew I wanted to use the gingerbread and sugared things stamp set for one of the cards for my Christmas card buffet, but wasn't too sure how I was going to use it. 
Then, I remembered this sketch from a card I made earlier, and viola, this is the card that evolved.

The only thing I would change is to wrap the ribbon around the whole card, not just the circle.  I had already taped down the DSP so it was too late.

I can't believe that we are already in November and getting ready for the Holidays. 
Where on earth has time gone?????

Thanks for peeking in.
Have a wonderful day.

Friday, October 28, 2011

I love it ....

I love it when you can take a card sketch, and just keep using it for all kinds of different cards.  We used this sketch in club to make a really cute Halloween card, and I figured why not use it for a really cute Christmas card too?????

This cute card sketch I originally found on Mary Fish's blog.  I just used the Christmas bingo bits stamp set for the 3 little windows and the Christmas Lane simply scrappin DSP with a little Lucky Limeade bow and viola.

I just love using Cherry Cobbler and Lucky Limeade together for Christmas cards, they really look nice together.

Thanks for peeking in today.
Have a wonderful weekend.

Wednesday, October 26, 2011

Mr. Snowman


I saw this ADORABLE snowman card on Stampin Connection last year and LOVED it.  It was made by Doris Denman and this card is just tooo stinkin cute.

I'm trying to decide if we should make this cute little guy at my card buffet.....lots of details and glitter....and there will be people there that have never played with paper before.  It might be a bit much for first timers.....not too sure....But isn't he just too cute?
Again, like most cards with lots of detail, this card is so much cuter in person. 

Thanks for peeking in today.

Monday, October 24, 2011

Oh Christmas Tree....

eThis is one of the cute Christmas cards that will be offered at my Christmas buffet class. 
In this view you can see that the middle Christmas tree is 3 dimensional and pops off the page.
 I love how it uses two different embossing folders, and the pennant parade stamp set, and coordinating punch.  It is really much cuter in person.  I saw a card similar to this online somewhere, but can't remember who it was.  I just changed a few things and I LOVE this card.
I hope the ladies like it too. 

Thanks for peeking in today.
Have a great day.

Saturday, October 22, 2011

happy Thanksgiving

I have been playing in my craft room and having soooo much fun this week. I don't think I have ever sent out Thanksgiving cards before....well, that is going to change this year. I love the French Foliage stamp set, but have never put it to ink yet, so that is the stamp set I choose to use this year. I also love the Gently Falling stamp set in the new Holiday mini, but I have been playing with that one. As you can see, I even made a matching envelope for the card.
And this is the inside. I'm going to list the things that I'm thankful for about the person that I'm sending this too, before I mail it to them.
Simple, but cute.
I have also been making Christmas cards for a Christmas card buffet that I am going to have in a couple of weeks. It has been fun creating and playing. I can't believe that we are almost in November already and thinking about Christmas again. Where does time go?????
Thanks for peeking in .
Have a wonderful day.

Saturday, October 15, 2011

Octobers Club Projects

Wow, it seems like forever since I've blogged last. Needless to say, I have been a little distracted by that new little grandson of mine. I mean really, what would you rather do? Hold a newborn baby, or play with paper? I know they are both great choices, but the baby wins for me everytime....lol.
Since I had club fast approaching I did have to put the baby down and get some crafting done. These are the 3 projects we made on Thursday night.
This one is a cute little box/note card. It holds Hershey nuggets on the one side, with a little note card on the other side. What a fun gift to give for ANY holiday or birthday celebration..
For this project I made it with two different front decorations. The options are limitless, and up to you and your imagination.
Here it is with the little note that is tucked inside, out so you can see the stamping on the bottom of it. Here it is with the front flap cut at an angle, with a little more decoration on the front with some extra leaves stamped and cut out and glued to the front. And the inside was stamped a little differently. The ladies just loved these little treats. I have to say that I first saw this cute little treat on Lisa Martz's blog and she sent me to splitcoaststampers for the directions. So, here is the link to get the directions.http://http://www.splitcoaststampers.com/resources/tutorials/treatboxcard/ if you would like to make some of these cute little treats too. This was one of the two cards we made as well. I got this adorable idea from Dawn Olfcheske's blog. She called it the peek a boo card. I think this would make such a cute card for a child's birthday or a Christmas card too. Again, the possiblities are endless. For the video tutorial to make this cute card, click on the DoStamping link on my sidebar. You should check out all her cute stuff, she's really talented.Then the last card we made, was a card I made at my upline's meeting in September.
This is what it looks like closed.....and when you open it up.....Isn't it cute? Again, we were talking about all the different ways you could use this design to make other cards.
I don't know if you can tell, but the smallest and the largest circles were ran through the Big Shot with the polka dot embossing folder.
I just love this stamp set Gently Falling that we used.
So, even though I haven't blogged for a while, I still have been playing with paper.
I need to get started on my Christmas card class that I am getting ready for soon too. It's just sooooooo hard to focus when I hear those sweet little newborn noises just calling for Grandmas's attention. I'm hearing them now.....oh my goodness.....gotta go!!!!
Thanks for peeking in.
Have a wonderful day.

Tuesday, September 27, 2011

We have a baby.....

Well in my last post I mentioned that I had done accupressure on my daughter to induce labor. Well, it must have worked because at 5:30 p.m. (2 hours after doing pressure points) she asks me what it's like when your water breaks. Sure enough, her water had broken. So, we headed to the hospital. Little Brayden was born a few short hours later. He arrived here on Earth at 12:52a.m. Monday morning. He was a big boy weighing in at 9 lbs and 9 ozs and 21 inches long.

As you can see he is adorable and I'm not proud at all.....NOT.

This is one of my favorite photos so far.

When we brought him home today, he was introduced to the family dogs. As you can see, Daisy was in love from the start. She really does LOVE Brayden.

I can't wait to finish the photo album I posted earlier. First I need to get some sleep. I think I've slept a total of 5 hours in the past 3 days. I got the privelege of staying in the hospital with my daughter while she was there. The guests bed was a very uncomfortable couch.....and I use the term couch loosely....that isn't even wide enough to lay on your back comfortably. But it was worth it to be there. I can't wait to crawl into my own bed tonight and get rested. My plans tomorrow are loving on that little boy. I can't get enough kisses on those cheeks of his.


Thanks for peeking in.

Sunday, September 25, 2011

Grandma brag booksl....

So, if you've read my blog at all lately, you know I'm waiting to be a grandma again.

So, while I was waiting yesterday I decided to make a cute little brag book to put pictures in to take to work and show the little guy off.

About 18 months ago I made this cute little brag book for my granddaughter Lucy when she was born. I decided I really liked the size and the amount of pictures that it held, so I made one with the same pattern for little Brayden.

This was little Lucy and the front of the brag book. Then when you open it up, it holds a few pictures on each side......but.....
As you can kind of see here, it has two pull out pages on each side to hold even more pictures.

That's what it looks like with the all the cute pictures in it. Well, since I don't have any baby pictures yet to put in it. Here is what it looks like while we wait.

I have to say that I didn't use stampin up dsp on this one. I did use Pool Party and Cherry Cobbler cardstock, but the DSP was from My Mind's Eye. My daughter wanted a more manly man type of scrapbook, and Stampin Up's baby paper isn't really manly man, it's more cutesy. Which is good too.

Anyway, this is the front of the scrapbook.

And this is the inside without any pictures and with the 4 pull out pages .

I will take pictures of it and show you when it's full of pictures of the cute little guy when he finally gets here.

It was so much easier to make the second time around. The first one I made seemed to take forever, because I didn't understand the directions all that well. When I finally figured it out, the directions made perfect sense. But, since I'd already made one, this made up in like an hour.
I got the directions from Lynn Pratt's blog Stamp n design. There is a link on my sidebar if you are interested. I think the tutorial cost $5.99, but I'm getting my money's worth.


My daughter has a doctor's appointment tomorrow and the doctor said if she hasn't had it yet, she will induce her if she wants. They are concerned because he is so big. So, if she hasn't gone into labor by tomorrow morning, I think she's going to take the doctor up on the inducement.

We have been doing accupunture points for inducing, and grandma's had a little chat with him, my son even went out and bought castor oil. We don't want her to do the castor oil because we have heard too many horror stories about how it was bad for the baby. She will just wait it out instead. So, hopefully next blog post has baby pictures in it.....hahahahaha


Thanks for peeking in today.

Thursday, September 22, 2011

Club order thank yous

This is one of the cute little projects we made at my upline meeting on Saturday. I thought they were so cute and perfect for a Halloween treat. Our original was a Christmas one, but I changed it for my club girls. They were so easy and quick to make up too.


I made a total of 8 the other night.
Here is the Christmas one we made on Saturday.

It's pretty cute isn't it??

Inside hides a yummy little treat. I used Mr. Goodbars, but at out upline meeting we used Kit Kats. What yummy treat would you put in yours????


I hope my ladies like these little treats, and know how much I appreciate them and their business. I really do love being a Stampin Up demonstrator. I love playing with paper, and I love sharing it with others.


Thanks for peeking in today.

Tuesday, September 20, 2011

A BIGGER candy wrapper treat....

I can't believe that I am still sharing fun things we learned at Convention. That's how much they pack into our convention experience. I can't remember who demonstrated this cute little....well, actually it's not little it's "bigger".....candy wrapper. Yep, it fits a king size candy bar inside there. Cool huh??


Are you wondering how I did that? It's sooooo easy actually. Instead of just a flat piece of 5 1/2" x 6 1/2" cardstock or DSP, you will need the normal width of 6 1/2" but you will need a longer piece for the length. So make your paper 6 1/2" x 9 1/2". On the 9 1/2" side, you will need to score your paper at 3 3/8" and 5 3/8". Fold your paper in on the scored lines. NOTE: Fold one in, and then the other will fold out. This will fit the candy wrapper die, then roll it through your Big Shot . When you open up the paper it will be the length you need to fit a king size candy bar. You just assemble it like you would the smaller version. As you can see in the middle, I just made a belly band to go around it so it would hide the score marks.


If this was confusing and you need a picture tutorial, just leave me a comment and I will "show" you how to do it.


I gave this as one of the door prizes at our last club night. It was a hit.


Thanks for peeking in today.

Monday, September 19, 2011

Cute little purse tutorial

Remember this cute little purse that I showed earlier? I said if you wanted to learn how to make it to let me know. Well, I got enough requests that I made a photo tutorial. I will forwarn you that the pictures aren't the best, but hopefully it will help you see how to make one of these cute little purses. It starts with a 12 x 12 piece of cardstock. Score it at 4" and 8". Turn it and score it again at 4" and 8". You will now have 9 4" squares scored on your paper.
You will need to cut off the 4 corners. To do this I lined my scored lines along my paper cutting edge and then cut.

Hopefully you can tell from this picture what it looks like AFTER I made the cut.

So, now I have all 4 corners trimmed off. On the sides where you trimmed your corners off, you will now need to make a score line in the middle of that space. I hope I'm not confusing when I explain this. In the photo below I have my ruler layed out acorss the middle of the cardstock. If you look closely you will see that two of the scored intersections are lined up with my ruler.

Now take your stylus and run it from the intersection to the end of the paper like below.

Below is a picture of the finished scored line. Right in the middle of that section. You do that for all 4 of the corners that were trimmed.
Now on the four full squares left, you are going to find the middle (which would be 2") If you look real close, you can see I made a little mark at the middle point.

Now from the mark, go up to the corner intersection and score.

Now, do the other side. From the mark, go up to the other intersection and score.

Now do that to the OPPOSITE square as well. These will be your sides. Your paper should look like this now. NOTE: when you are making these score lines, make sure they are exact. If not, your purse won't fold up correctly.

You now need to cut your DSP to decorate the middle. You will need 5 pieces cut at 3 7/8" square. 3 of those will get adhered to the 3 squares in the middle. The 2 remaining squares need to be cut. To do this, I folded it slightly in the middle and made a little mark. If you look closely you can see my mark at the bottom of my DSP.


Now I lined up my mark and one of the corners on my paper cutter, and cut.

Then I flipped it around, and lined up the other corner with the mark and cut it also.

Now you should have a triangle. Do this to both pieces and adhere to the inside triangles of your purse.

Your purse should be looking like this by now.
Now you will need to make the embellishments for the outside. You will need a top note die from cardstock and one from DSP. Trim the DSP on the perforated edge and adhere to the cardstock top not die.

It should now look like this.

Fold this in half the longway.

With your crop a dile, go in as far as you can and punch a hole with the largest hole punch. Do this on both sides.


Take about 9-10 inches of ribbon and pull through the holes like the picture below. Make sure your ribbon isn't twisted, so you have a nice smooth handle. I layed down 3 rows of sticky strip to adhere my ribbon too, because this is also going to hold the pure together so it needs to be secure.


Attach this to the back of your purse with the ribbon being hid by the purse itself. Then I added a piece of velcro to the front of the top note and then shut the purse and it attached the velcro perfectly aligned.


Decorate the front however you like, and you have yourself a cute little purse to hold some yummy treats.

I hope this tutorial was helpful and not confusing. Feel free to leave a comment and let me know if it helped or I needed to clarify anything.


Thanks for peeking in today. I am waiting for my 6th grandbaby to be born here anytime now. Hopefully soon. I will have to interupt this "craft" blog for some "grandma" pictures when it happens.....hahahahahaha


Thanks for peeking in.