Friday, December 31, 2010

Valentine's Day card #2

I absolutely LOVE this new embossing folder that is coming up in the new Occasions Mini Catalog. I think everyone needs to have this thing. I mean just look at how nice it frames the focal point of this card. I could just go crazy with this thing from now on, but I will try to contain myself ....hehehehe
I have to say that I just love ruffling the ribbon like I did on this card. It is so easy to do and adds such a fun texture. Again, had to give the inside some fun.
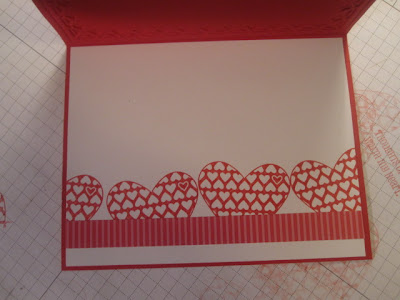
Can you believe it.....I have yet another post of a fun Valentine project I made the other night. It's not a card, but I LOVE IT. I think it turned out really cute and can't wait to make some more......so come back tomorrow for that one.

Thanks for peeking in today.
It's Friday and the last day of the year. Wow!!!! Where has time gone??

Be safe tonight!!!!

Thursday, December 30, 2010

Finally something to post....

Yesterday I finally cleared off the mess......including a TON of ants all over my desk. They found a piece of salt water taffy on my desk and were having a party with it!!! UGH!!!
But, that did not stop me from playing with paper. I have been itching to make some Valentine's Day cards and finally did. This is just one of the ones I made last night. I think it's simple but cute. This is the lovin I gave to the inside.
I used the supplies from the new special that Stampin Up is having right now.

I made more, but since I'm such a slacker at blogging....I decided that I would post one project I made a day. You know....just in case I have another dry spell and can't find time to play and have nothing to share. ; )

Thanks for peeking in today.
Make it a wonderful day, and go and do something fun!!!

Tuesday, December 28, 2010

Oh my goodness....

I can't believe how long it has been since I lasted posted on this little blog of mine.
I have been so absolutely crazy busy with getting everything ready for my family for Christmas, and then being with them for 3 fun-filled days, and then recuperating from it all, that I haven't even had time to play with all of these new toys.
Look at all these new toys just wanting to be played with.
When I sat down to preorder from the new upcoming Occasions Mini catalog, I just coulnd't contain myself. I think I've ordered the whole catalog...lol I'm going to give some loving to these neglected "new toys" here in the next few days, and then I will post my creations.
hmmmmm.....what will I play with first????
Thanks for peeking in.
Have a wonderful day today.

Tuesday, December 14, 2010

I've been a busy girl...

I made a bunch of these as thank you's this month for my club members, and had so much fun making them, I thought it would be fun to make some for the ladies at work too.
So, I got to work and made 12 more.
They are the cute little hand sanitizer holders from Bath & Body Works. There are tons of tutorials out there for these, but if you can't find one and want the directions, leave me a comment and I will get them to you.
Edited to add: For the tutorial I used...click here... The inside....
I made 3 different styles....and here they are...


Then I got carried away with the camera and took all kinds of pictures of them....hahaha

And here they all are together.
I hope they like them.
Thanks for peeking in.
Have a very wonderful day.

Sunday, December 12, 2010

Tags, tags, and more tags...

I thought it would be fun to make some "special" tags for Christmas presents for my family this year. As I am getting ready to attach them to their wrapped presents, I realize that I will be reusing these year after year. The thought of tossing these out after one year makes my heart sad....I won't be saving bows this year, I will be saving tags....hahahaha

Thanks for peeking in today.
Have a wonderful day today.

Saturday, December 11, 2010

December Club Projects

I have been such a bad blogger lately, so here are the projects that I promised yesterday that I would post today.
We made these adorable snowglobe cards.....with actual water in there. I have to say that this was cased from someone on Stampin Connection and I can't for the life of me remember who it was....so if it was you....please step forward and claim it.
The key to keeping the water from getting everywhere is placing a piece of transparency behind the water to seal it in there. We just added some glitter for the "snow", and everyone that sees this card just loves it. It really is cuter in real life. It's fun to play with too. Here is a closer look at the water. I could have put a little more water in there, but oh well.
This is the other fun project we made. My hostess wanted to make a wine bottle topper. Since I don't drink, I made it into a Martinelli's bottle topper. I saw a card I really liked on Chat's website and took the idea and made it into this bottle topper. To see Chat's original card click here. We added a cute bow, and what a fun inexpensive gift this would make for neighbors or friends.
Another close up.
So, how are you doing with all your gifts for this holiday season? I still need to get my cards sent now that they have been made. I'm such a slacker when it comes to the post office.
Thanks for peeking in.
Have a wonderful day.

Friday, December 10, 2010

Playing with my new toys....

Yesterday I finally received my box of preorders from the upcoming Occasions Mini Catalog, and tonight I sat down and played with them.
I am kind of tired of making Christmas cards, so I decided to just make a girly card instead.
I used the Build a Blossom stamp set and Build a Blossom punch with Blushing Bride and Pear Pizzaz. This card made up pretty quickly once I decided what I wanted to do. Then I had to give the inside some love. That little peek of Blushing Bride cardstock is the ribbon punch. I like how it just peeks up over the Pear Pizzaz DSP.
I have some more fun Christmas projects that we made at club this month to post too. Look for those tomorrow.
Have a wonderful day.

Thanks for peeking in.

Saturday, December 4, 2010

Ghiradelli chocolate treat holder tutorial

We made this adorable Ghiradelli chocolate holder at club this week, and it was so easy and quick to make .... not to mention fun and cute!!! One of my friends asked me if I would show on my blog how to make it, so she can remember later. So here it is:You will need: 1 3x6 3/4 inch piece of Cherry Cobbler cardstock; scored at 3" & 3 3/4"
1 6x6 piece of DSP; scored at 1/2"
1 2 1/4"x1 1/2" piece of Very Vanilla cardstock
1 2 1/2"x 1 3/4" piece of Cherry Cobbler cardstock
1 2 3/4"x2" piece of Old Olive cardstock
1 strip of Very Vanilla, cut from the Tasteful Trim die scallop section
1 piece of cord, or ribbon 10" long
1 piece of Cherry Cobbler seam binding ribbon 20" long
Score your DSP and Cherry Cobbler cardstock on the score lines. Make sure that the side of the DSP that you want showing is the little half inch piece facing you.
Apply adhesive on the 1/2" strip, and fold up and adhere. It should now look like the top piece in this photo.
Fold in down flat now. Then take your 1 1/4" circle punch and punch only half way up on each of the sides.
Now score the DSP all folded at 2 3/4" and 3 1/4" and fold on the score lines. It should now fit very nicely into the cardstock piece.
Now take your 1/16" punch and punch two little holes in the middle to put your gold cord through, or ribbon or whatever you are using. If you use ribbon, you will need to use a bigger punch than the 1/16" punch. Then attach your gold cord, or ribbon and tie a bow on the outside. This will be the only thing securing the middle piece in, so tie it tight.
Now decorate your front. I took the piece of Very Vanilla and stamped, using my markers to color the stamp. I used the Sweet Seasons stamp set. Layer each piece together as shown in picture.
I like to use a lot of stampin dimensionals to make sure it doesn't come off. Then take your ribbon and slide it under the gold cord and wrap it around the cardstock evenly. Centering your decoration for the front, secure it to the front and that is all I used to secure my ribbon in place. Because I was using the seam binding, and it is a little more flimsy, I didn't want to glue it down and have it bind up on me. You can do it anyway that suits you best.
Just insert the yummy chocolates inside the little pouches,tie the ribbon, and you are done.
And here again, we have the finished piece. Easy huh?
I thought they were so much fun to make, and so darn cute, that I made a whole bunch of them....this is only a small batch of them in this photo....I'm going to take them to work on Monday and pass them out and spread some Christmas cheer.
So, now that you see how easy they are. Go make some for yourself.
Have a wonderful day everyone.
Thanks for peeking in.
P.S. I have to give credit where credit is due. I cased this from Becky Roberts. I just changed the dimensions to better suit what I was looking for. I love Becky's work. She is so darn talented. You can see her blog here.