Remember this cute little purse that I showed earlier? I said if you wanted to learn how to make it to let me know. Well, I got enough requests that I made a photo tutorial. I will forwarn you that the pictures aren't the best, but hopefully it will help you see how to make one of these cute little purses. It starts with a 12 x 12 piece of cardstock. Score it at 4" and 8". Turn it and score it again at 4" and 8". You will now have 9 4" squares scored on your paper.
 You will need to cut off the 4 corners. To do this I lined my scored lines along my paper cutting edge and then cut.
 Hopefully you can tell from this picture what it looks like AFTER I made the cut.
 So, now I have all 4 corners trimmed off. On the sides where you trimmed your corners off, you will now need to make a score line in the middle of that space. I hope I'm not confusing when I explain this. In the photo below I have my ruler layed out acorss the middle of the cardstock. If you look closely you will see that two of the scored intersections are lined up with my ruler.
 Now take your stylus and run it from the intersection to the end of the paper like below.
 Below is a picture of the finished scored line. Right in the middle of that section. You do that for all 4 of the corners that were trimmed.
 Now on the four full squares left, you are going to find the middle (which would be 2") If you look real close, you can see I made a little mark at the middle point.
 Now from the mark, go up to the corner intersection and score.
 Now, do the other side. From the mark, go up to the other intersection and score.
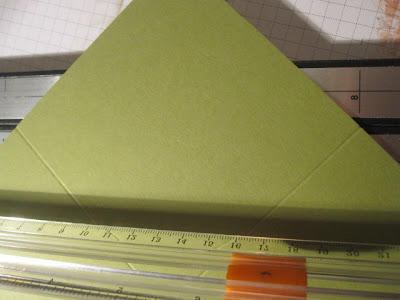
 Now do that to the OPPOSITE square as well. These will be your sides. Your paper should look like this now. NOTE: when you are making these score lines, make sure they are exact. If not, your purse won't fold up correctly.
 You now need to cut your DSP to decorate the middle. You will need 5 pieces cut at 3 7/8" square. 3 of those will get adhered to the 3 squares in the middle. The 2 remaining squares need to be cut. To do this, I folded it slightly in the middle and made a little mark. If you look closely you can see my mark at the bottom of my DSP.
 Now I lined up my mark and one of the corners on my paper cutter, and cut.
 Then I flipped it around, and lined up the other corner with the mark and cut it also.
 Now you should have a triangle. Do this to both pieces and adhere to the inside triangles of your purse.
 Your purse should be looking like this by now.
 Now you will need to make the embellishments for the outside. You will need a top note die from cardstock and one from DSP. Trim the DSP on the perforated edge and adhere to the cardstock top not die.
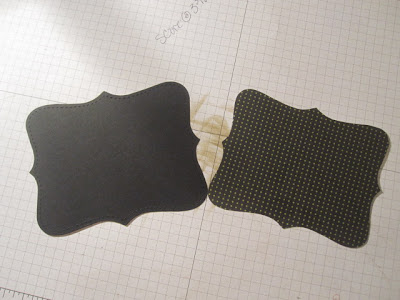 It should now look like this.
 Fold this in half the longway.
 With your crop a dile, go in as far as you can and punch a hole with the largest hole punch.
  Do this on both sides.
 Take about 9-10 inches of ribbon and pull through the holes like the picture below. Make sure your ribbon isn't twisted, so you have a nice smooth handle. I layed down 3 rows of sticky strip to adhere my ribbon too, because this is also going to hold the pure together so it needs to be secure.

 It starts with a 12 x 12 piece of cardstock. Score it at 4" and 8". Turn it and score it again at 4" and 8". You will now have 9 4" squares scored on your paper.
 You will need to cut off the 4 corners. To do this I lined my scored lines along my paper cutting edge and then cut.
  Hopefully you can tell from this picture what it looks like AFTER I made the cut.
 So, now I have all 4 corners trimmed off. On the sides where you trimmed your corners off, you will now need to make a score line in the middle of that space. I hope I'm not confusing when I explain this. In the photo below I have my ruler layed out acorss the middle of the cardstock. If you look closely you will see that two of the scored intersections are lined up with my ruler.
 Now take your stylus and run it from the intersection to the end of the paper like below.
 Below is a picture of the finished scored line. Right in the middle of that section. You do that for all 4 of the corners that were trimmed.
  Now on the four full squares left, you are going to find the middle (which would be 2") If you look real close, you can see I made a little mark at the middle point.
 Now from the mark, go up to the corner intersection and score.
 Now, do the other side. From the mark, go up to the other intersection and score.
 Now do that to the OPPOSITE square as well. These will be your sides. Your paper should look like this now. NOTE: when you are making these score lines, make sure they are exact. If not, your purse won't fold up correctly.
 You now need to cut your DSP to decorate the middle. You will need 5 pieces cut at 3 7/8" square. 3 of those will get adhered to the 3 squares in the middle. The 2 remaining squares need to be cut. To do this, I folded it slightly in the middle and made a little mark. If you look closely you can see my mark at the bottom of my DSP.
 Now I lined up my mark and one of the corners on my paper cutter, and cut.
 Then I flipped it around, and lined up the other corner with the mark and cut it also.
 Now you should have a triangle. Do this to both pieces and adhere to the inside triangles of your purse.
 Your purse should be looking like this by now.
  Now you will need to make the embellishments for the outside. You will need a top note die from cardstock and one from DSP. Trim the DSP on the perforated edge and adhere to the cardstock top not die.
 It should now look like this.
 Fold this in half the longway.
 With your crop a dile, go in as far as you can and punch a hole with the largest hole punch.
  Do this on both sides.
 Take about 9-10 inches of ribbon and pull through the holes like the picture below. Make sure your ribbon isn't twisted, so you have a nice smooth handle. I layed down 3 rows of sticky strip to adhere my ribbon too, because this is also going to hold the pure together so it needs to be secure.
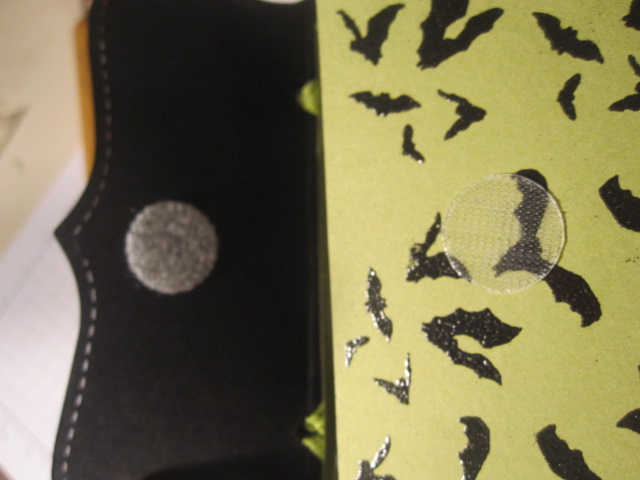
Attach this to the back of your purse with the ribbon being hid by the purse itself. Then I added a piece of velcro to the front of the top note and then shut the purse and it attached the velcro perfectly aligned.
 Decorate the front however you like, and you have yourself a cute little purse to hold some yummy treats.
 I hope this tutorial was helpful and not confusing. Feel free to leave a comment and let me know if it helped or I needed to clarify anything.
 Decorate the front however you like, and you have yourself a cute little purse to hold some yummy treats.
 I hope this tutorial was helpful and not confusing. Feel free to leave a comment and let me know if it helped or I needed to clarify anything.
Thanks for peeking in today. I am waiting for my 6th grandbaby to be born here anytime now. Hopefully soon. I will have to interupt this "craft" blog for some "grandma" pictures when it happens.....hahahahahaha
Thanks for peeking in.
Awesome tutorial Andrea. Very clear and easy to follow. This little purse is so cute! TFS.
ReplyDelete